2 Understanding the Genesis Preferences
2.4 Modem/TA
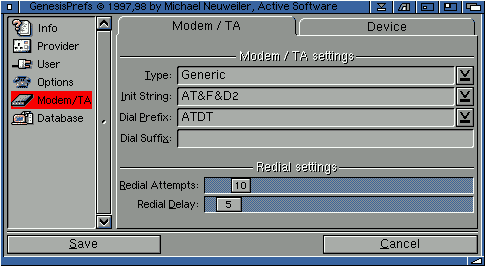
This section allows you to setup your modem or ISDN terminal adaptor (TA) in order to connect yourself to the Internet.
2.41 Modem/TA

Some useful strings that may be used:
| Command | Function |
|---|---|
| &C0 | Force RLSD active regardless of the carrier state. |
| &C1 | Allow RLSD to follow the carrier state. |
| %C0 | Disable data compression. |
| %C1 | Enable MNP 5 data compression. |
| %C2 | Enable V.42 bis data compression. |
| %C3 | Enable both V.42 bis and MNP 5 compression. |
| &D0 | Interpret DTR ON-to-OFF transition per &Qn: &Q0, &Q5, &Q6 The modem ignores DTR. |
| &D1 | Interpret DTR ON-to-OFF transition per &Qn: &Q0, &Q5, &Q6 Asynchronous escape. |
| &D2 | Interpret DTR ON-to-OFF transition per &Qn:&Q0, &Q5, Q6 The modem hangs up. |
| &D3 | Interpret DTR ON-to-OFF transition per &Qn:. &Q0, &Q5, &Q6 The modem performs soft reset. |
| E0 | Turn off command echo. |
| E1 | Turn on command echo. |
| %E0 | Disable line quality monitor and auto retrain. |
| %E1 | Enable line quality monitor and auto retrain. |
| %E2 | Enable line quality monitor and fallback/fall forward. |
| F0 | Select auto-detect mode (equivalent to N1). |
| &K0 | Disable DTE/DCE flow control. |
| &K3 | Enable RTS/CTS DTE/DCE flow control. |
| &K4 | Enable XON/XOFF DTE/DCE flow control. |
| &K5 | Enable transparent XON/XOFF flow control. |
| &K6 | Enable both RTS/CTS and XON/XOFF flow control. |
| L0 | Set low speaker volume. |
| L1 | Set low speaker volume. |
| L2 | Set medium speaker volume. |
| L3 | Set high speaker volume. |
| M0 | Turn speaker off. |
| M1 | Turn speaker on during handshaking and turn speaker off while receiving carrier. |
| M2 | Turn speaker on during handshaking and while receiving carrier. |
| M3 | Turn speaker off during dialing and receiving carrier and turn speaker on during answering. |
| W0 | Report actual baud rate connection (ie. 57600) |
| W1 | Report line speed, EC protocol and DTE speed. |
| W2 | Report actual connection speed (ie. 48K) |
An example of a standard/simple initialisation string is "AT&F&D0W2".
You'll see the delay (in seconds) within the Genesis dial window when Genesis is waiting to redial a number. For example "...3 secs to go".
2.42 Device

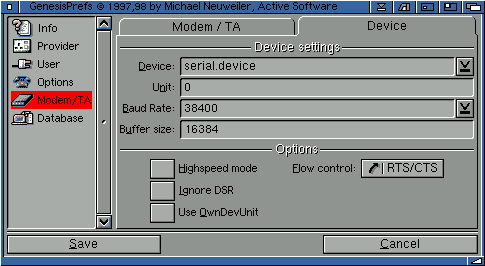
Note: the internal Amiga "serial.device" is quite buggy, especially when using with an 060 or PPC board in your computer. You could use a replacement device such as the "8n1.device" or "artser.device", both can be used with the internal Amiga serial port.Obviously the best solution would be some kind of replacement serial port: this could be a Hypercom card, Whippet/Surf Squirrel or other buffered port. The BoXeR motherboard, for example, contains a built in serial buffer, which means that there should be no need for a serial card in a BoXeR (or similar) based Amiga.
We also suggest you limit the numbers of colours you use on your screen (and hacks used on your system) when using the normal serial.device and/or Amiga serial port. If you use more than 64 colours you might find you either can't connect or have modem problems once connected.
If you are using the normal serial port the maximum baud rate you can achieve is normally 57600, although some people can manage 115,200 baud.
We recommend the following speeds depending on the type of modem:
| Modem | Recommended Maximum Baud Rate |
|---|---|
| 14400 | 19200 |
| 28800 | 38400 |
| 33600 | 57600 |
| 56000 | 115200 |
| 112000 | 115200 |
Default is 16384 bytes or 16K (it is fairly high already, a size above 50000 won't make much sense).
For best results, set the highspeed mode whenever possible.
The only problem is that when one program is using the device, the other can't.
Go to the previous, next, chapter, table of contents.